Easy Configuration Experience
- Step 1: Select country, category, and audience
- Step 2: Add your stimuli
- Step 3: Add stim details
- Step 4: Add custom questions and select other add-ons
- Step 5: Preview your survey
- Step 6: Pacing and scheduling
We have enhanced the configuration experience for Screen It 2.0 and Activate It FMCG [Beta]. When you start a new project, select the New Configuration Option.

The new configuration screen shows every part of the process consolidated on the same screen so you don’t have to flip between pages. Section 1 is where you will add your stimuli and fill out all the required details, and Section 2 covers additional options that are not included in the base price of the solution like custom questions or additional insights.

Step 1
Name your project, choose the country, category and audience (if applicable).
Start by editing the name of your project. Make sure you choose the correct market, then select your category. This is an important decision that affects the rest of the survey as well as your analytics and learning over time. If you haven’t already, head to our Category article for more information.

If you are using Screen it 2.0, you will need to choose an Audience. For more details, check out our Audience Selection article. In Activate it, the audience is tied to the category choice, for more information, head to our Representative Audiences Article.
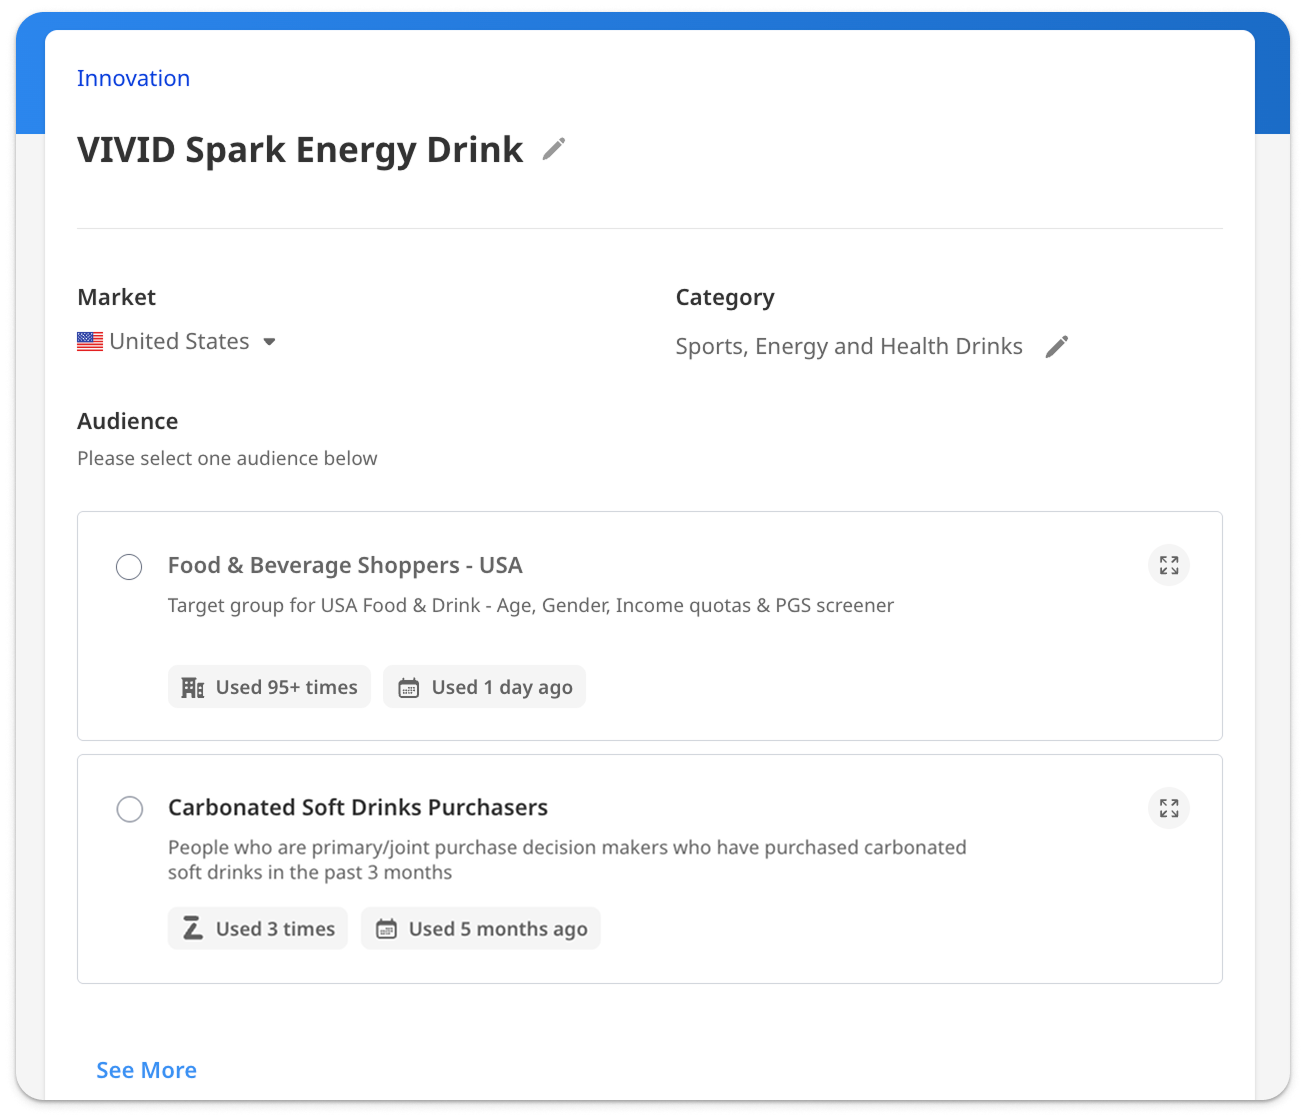
Once you choose your category and audience, the appropriate sample size for that category will appear. It always defaults to the recommended sample size, but you can adjust it as needed.
Step 2
Add your stimuli.
Now you can add your stimuli to test. Be sure to check the media requirements since they can vary from solution to solution.

Check your specific solution to determine how many stim you can upload at one time.

Step 3
Add details for your stim(s).
In Activate It, once your stimuli are uploaded, you can click the pencil to edit each one. This step is required to add details for each one. If you're using Screen It, you can jump to the Screen It section.

- Concept Image: Here, you can swap out your image.
- Concept Name: This is the name that will be displayed in the charts and reports for the analysis. Respondents won’t see this name, so you can use an abbreviation or other name you use internally for the concept.
- Respondent facing concept name: This is the name of the concept that will be used in the survey.
- Concept description: Upload a text description of the concept. You can include anything in this description, but exclude any information about pricing since there will be questions that cover them later.

The next section covers more details about your concept.
|
Brand The brand name settings are used in our automatic checks for text that the respondent types themselves. Choose the brand from the drop-down menu to automatically populate the parent and sub-brand (if applicable). All alternative spellings or common misspellings are included if it is a brand you already have configured in your Brand Library. If you are testing with a Brand name you haven't used before, you have the option to add it and all applicable settings. Once the project is started, this new brand will be added to your Brand Library. |
|
|
Concept format If your concept will have multiple sizes or formats, you can enter each one here. If there is only one variation of your concept, select Single size or format. |
|
|
Concept substitutions Enter up to 20 competitor products that a respondent might choose if your concept were unavailable. You’ll need to add at least 2. |
|
|
Attributes Select the attributes you would like to test for. The most common attributes are displayed for you to choose from. You can also add custom attributes. |
|


Optional Metrics
Up until this point, all of the above items have been required to move on with the configuration. This section will include optional metrics that will vary depending on the solution you use. We’ll use an example from Activate It 2.0.

Variant purchase is a question that will help you gain insight into two different buying scenarios.
- Variant purchase likelihood: Respondents are asked to rate how likely they are to choose each variant. This helps to show each variety’s appeal in relation to each other.
- Variant Purchase at trial: Respondents are asked to select which variant they are most likely to choose the first time they try it. The results can predict in-market sales split.

Add details to the rest of your stims
Once you complete the details for the first stim, it turns green. Moving on to the next stim, you can either edit it the same way we did for the first one, or you can populate it with details from another stim to save you some time. On this same screen, you can also duplicate the stim or delete it.

Populate details to all
Choose this option if you want all of your surveys to have the same setup. The images, names and descriptions will remain unchanged, so you will still need to edit those details for each one, but all of the other details will be carried over from the original stim.

Populate details from…
This option will populate the selected stim with details from another stim. You can edit the selected stim’s name and images directly from this screen.

Once you have filled out the details for each stim, you can move on to the second section.
Screen It stim details
- Enter the text description of your concept.
- Choose your stim fomat and add your stims. You can use text only, images, or both.
- Select your stimuli type, image evaluation (where applicable), and your ranking metric from the dropdown lists.

Step 4
Add custom questions and other add-ons
The right side of the configuration page includes all of the add-on options for your project.
The custom questions section lets you add your own questions to the survey. These are usually used to add specific filtering questions before the body of the survey or to gather additional information after the respondent has seen the concept.
In Screen It, you'll see another section following the custom questions to add more specific questions to your survey, which we will cover later.

Custom Questions
In this guide, we will quickly cover how to add custom questions to your project. For more guidance on best practices for custom questions, head to our Custom Questions Article.
For best results, add no more than 5 total custom questions.

New Library
The custom questions are organized into two sections for easier access. Your New Library will display questions that you create using this new configuration process. You can still add questions from previous projects found in the original library. When you add a question from the original library, it will be automatically migrated to the new library.
Original Library
If your team has used Zappi before, there may be some custom questions that were saved from previous projects. These will be displayed in the original library.
Filtering and searching for custom questions
Enter key words into the search bar to find specific questions and use the filter to find specific question types.


New Custom Question
To add a new custom question, click ‘+ New’ next to the search bar.

Select the type of question, then fill in the rest of the details. This step will vary depending on the type of question, so you can head to our Custom Questions article for more details.

Once you have all of your questions added, you can rearrange them to display before or after the respondent has been exposed to the stim.
To move a custom question to display before the stim, click on the dots next to the question and drag it above the “Core survey questions” section.

Additional Insights
For Screen it 2.0, you will see a list of optional metrics under the custom questions section. You can choose to use as many or as few of these questions as you like. Your research goal will usually determine which of these questions you want answered. Some options will require additional detail, and others simply add another question to the survey. If you need more information on each option, hover over the question mark icon.

Step 5
Preview your survey.
If you want to preview your survey before launching, click ‘Preview Survey’, then ‘Prepare Survey’ in the next window. There are 3 ways to preview your survey to see what the respondents will see. You can test it yourself in your browser, download a PDF, or share the testable version with a link.


When you are happy with your configuration, click Checkout.

Step 6
Pacing and scheduling
Select the date and time you would like your survey to launch. The times are displayed in your timezone.
Benefits of scheduling:
You can work during your normal hours and schedule the project to launch at the right time for a representative sample. It’s particularly useful if you’re working in global markets. You can create consistency by always launching your surveys at the same time to achieve a representative sample, rather than each one launching at the time you set it up.
Adjust your pacing option if you would like the survey to run over a longer period of time.
Benefits of Pacing:
Pacing can improve the consistency of your results.
The more days you run your research, the greater the chance of getting responses from the broader segments of your audience. For example, people have work, activities, or availability on different days of the week. Running research over 7 days ensures everyone has a chance to respond regardless of their routines. We know that you won’t always have 7 days, so you can choose shorter pacing windows if they work better for you. By default, we would recommend 2-day pacing where available.
Check out our article on pacing and scheduling for more details.


Finally, toggle the option to notify your team members when your project launches.
You can now review the price summary. If you need to go back and make a change, click the back button in the upper left of the screen.

Ready to launch!
When you are ready, click Launch Project. And that’s it! You can sit back and let us handle the rest. You’ll be able to watch the progress of your fieldwork on the homepage, but we’ll send you an email when your project is complete.

Head over to the post-launch section of our Getting Started Guide for more information on what to do after you launch your project.